You like using Chrome cause Internet explorer just sucked to you right and while you are filling in a form to register your info to that cool social media website and you make a mistake. You hit the backspace key and for some reason the browser goes back to a previous page. You are a little surprised and confused and you find out eventually all of that typing you did is now lost and you have to fill the form out again. You are now frustrated.Well you are not alone cause this happened to alot of people and soon your frustrations will be alleviated. Google Chrome is fixing the issue. In Chrome’s next big release it is removing the shortcut that has the “backspace” key returning you to the previous page. To be more specific, as in the example I mentioned latter while filling out a form if you were not focused in the text box that you were typing in, Chrome interpreted the backspace key as a “back” button which would cause you to lose all of the data you had just entered.
Engineers from Google say that years of user complaints have finally pushed them to get rid of the shortcut. Well some more hardcore users have complained about it but Google said that the numbers and the ease of the change prove it worth the move.
Google product manager, Tyler Odean writes, “We’re definitely aware of the frustration that this causes users who have come to rely on the shortcut…… However for users who *don’t* understand the behavior of the shortcut, which is the majority of users, the loss of data is also super frustrating and they are less equipped to understand or prevent their frustrations.”
BUT……. People who still want the shortcut to stay can either use alternates (alt+left arrow on Windows, command+left arrow on Mac) or install a Chrome extension that brings it back again. So you have until late July to decide when the fix will officially roll out.
Google Chromebook

Written by the award-winning team that created the best-seller Windows 7 Inside Out, it digs deep to explain not just how new features work, but why they work that way. The authors are backed by world-class technical editors and inside sources at Microsoft to make sure their information is accurate and complete.
Windows 10 is better (in ways) yet all that white is just annoying. I find it a bit hard to find where to place the mouse so I can drag windows from screen to screen. (Yes I have 2 screens.) Well Windows 10 uses white title bars (That is what they are called.) by default. This is a bit of a change from Windows 8 which did let you choose any color you wanted. There is a way to get some color to your desktop title bars. Okay this method only affect some apps, mainly the traditional apps but not the universal apps. The universal apps stick to the white but a color change for some apps can really make a different for some depending on what apps you use consecutively. The univeral apps though depend on the developer of the app to specify a color. You can make the universal apps use a dark (hidden) theme though. I will talk about that after.
Change Windows Theme Files
Since Microsoft chose to rather force the white title bars we have to make a few changes. See in the DWM.dll theme file, there is code that compares the current theme file with the “aero.msstyles” file which is the default theme file. If it matches windows ignores the color in the file and sets the color to white. A solution… Just change the default Windows theme file to not have the name “aero.msstyles”.
- Open File Explorer and navigate to C:WindowsResourcesThemes. (The more windows changes the more it stays the same.)
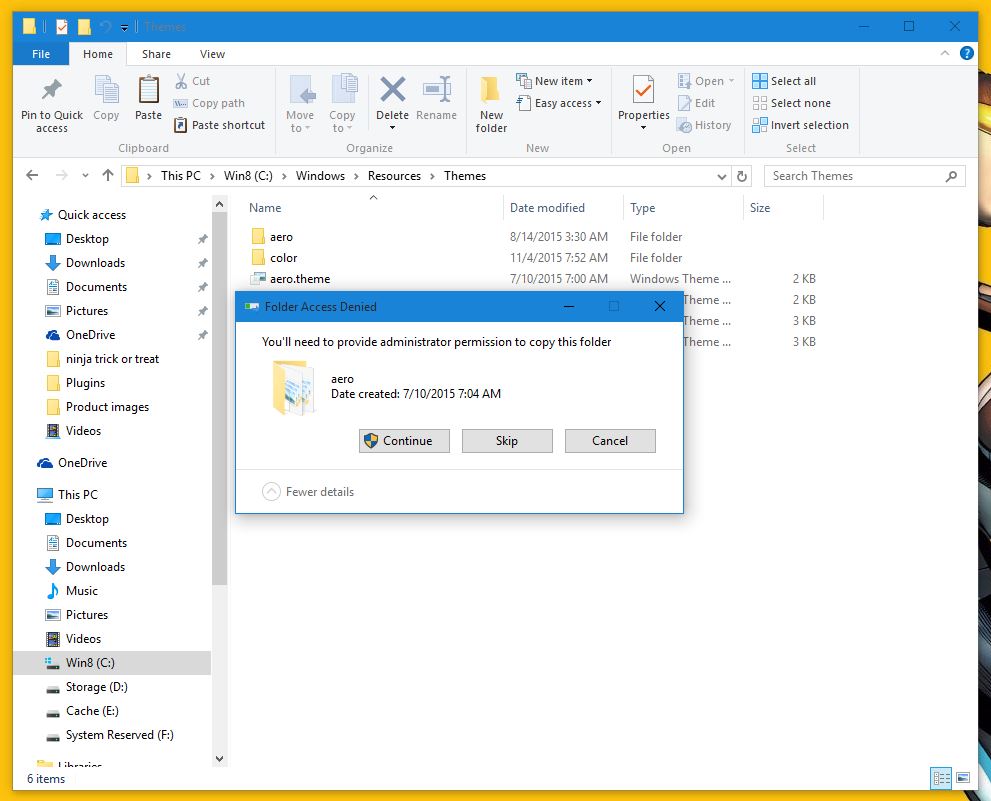
- Select the “aero” folder and copy it (CTRL+C to copy) then paste it (CTRL+V to paste) right after into the same folder so you end up with 2 folders called aero, the 2nd folder having “copy” in its name. During the process you will get a UAC prompt that you will click “Continue” for. After select “Do this for all current items” and click “skip” when you see the File Access Denied window.
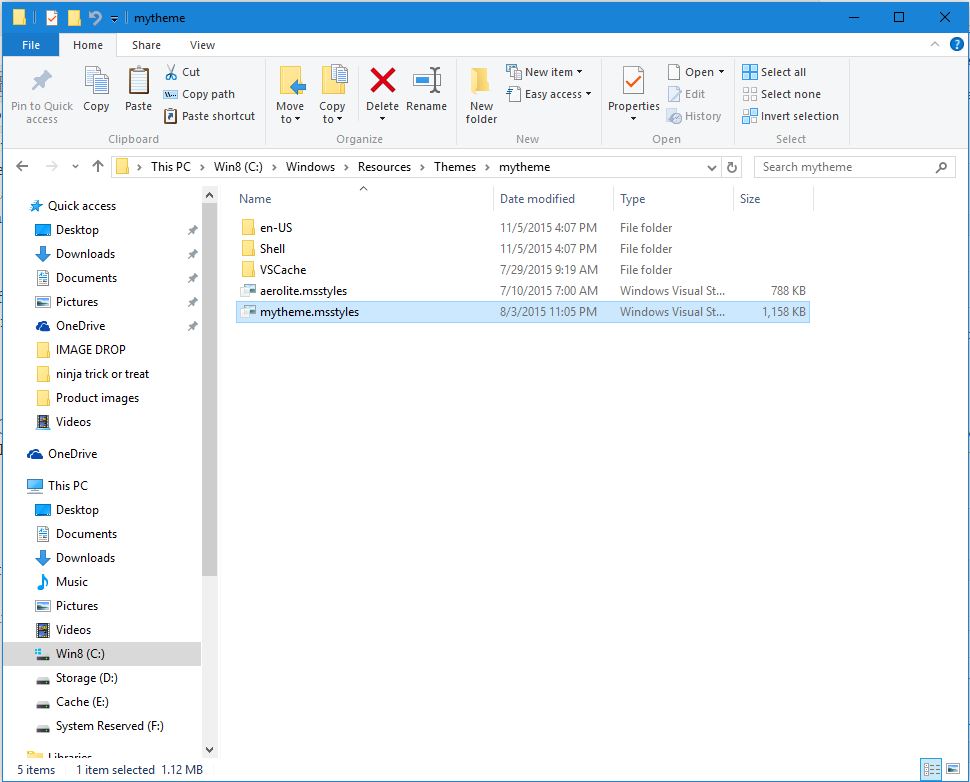
 Once you do that you will have made a folder called “aero – copy”. Rename it to whatever you want, in this case I will say rename it to “mytheme”. Just make sure you remember what you named it because you will have use that name later.
- Go inside your new folder “mytheme” and you will see a file named “aero.msstyles”. Rename it to “mytheme.msstyles”. Oh and click Continue when you see the UAC prompt.
 Open the en-US folder and you will see a file called “aero.msstyles.mui”. You need to rename it to “mytheme.msstyles.mui”. Again when you see the UAC prompt just click Continue. (The en-US folder may have a different name if you are using a different language version of Windows so just use a little common sense and goto the the folder with your language name with its shortened 2-letters and a dash with country code. Which in this case is US. (en = English, US = United States)
 Now go back to the main Themes folder and there is a file named “aero.theme”. You will need to copy it to your desktop because Windows will fight you in altering this file so copy and paste it to your desktop. Once you have your copy of the file on your desktop just rename it to “mytheme.theme”.
- Right-click on the mytheme.theme file and select OPEN WITH, then select CHOOSE another app (click on MORE APPs) and open the file with Notepad. Scroll down in the file and locate the line under [VisualStyles]. It should be reading like this: Path=%ResourceDir%ThemesAeroaero.msstyles. Replace or change the Aero part to mytheme so it reads like this:
Path=%ResourceDir%ThemesAeromytheme.msstyles.
Save the file and close notepad. It will basically look like this.[VisualStyles]
Path=%ResourceDir%ThemesAeroAero.msstyles
ColorStyle=NormalColor
Size=NormalSize
AutoColorization=0
ColorizationColor=0XC40078D7 - Now select the mytheme.theme file you edited on your desktop and cut (cut and paste) it by pressing CTRL+X then go back to the C:WindowsResourcesThemes folder then paste it by pressing CTRL+V. Agree to the UAC prompt when you are done. These steps have helped you create a theme that can use colored window title bars.
- Now you have to activate the theme and you can do that by just simply double-clicking on it. Your title bars once finish applying should be colored now.

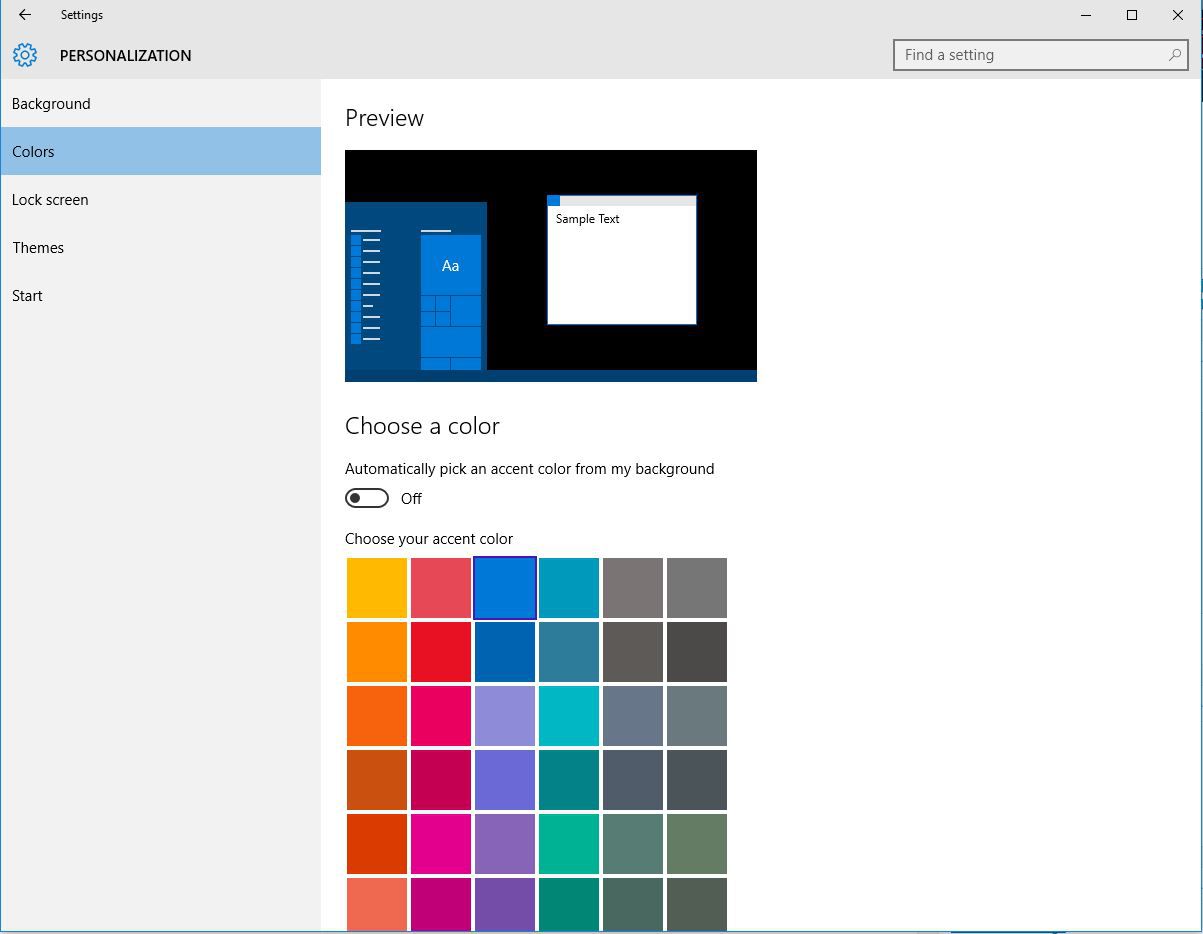
From the images I am sure you see I have already done this so you have your proof that it does work. Windows 8 had like a default that auto chose a color based on the colors in your curerently selected wallpaper. You can pick colors too if you want. You just have to right-click on the desktop and select Personalize (the long way is to open your Start Menu and select Settings and find Personalization from there.) Once you are there just select the Colors option/category and disable the “Automatically pick an accent color from my background” toggle and a list of colors will show up. (Notice this window is still white.)

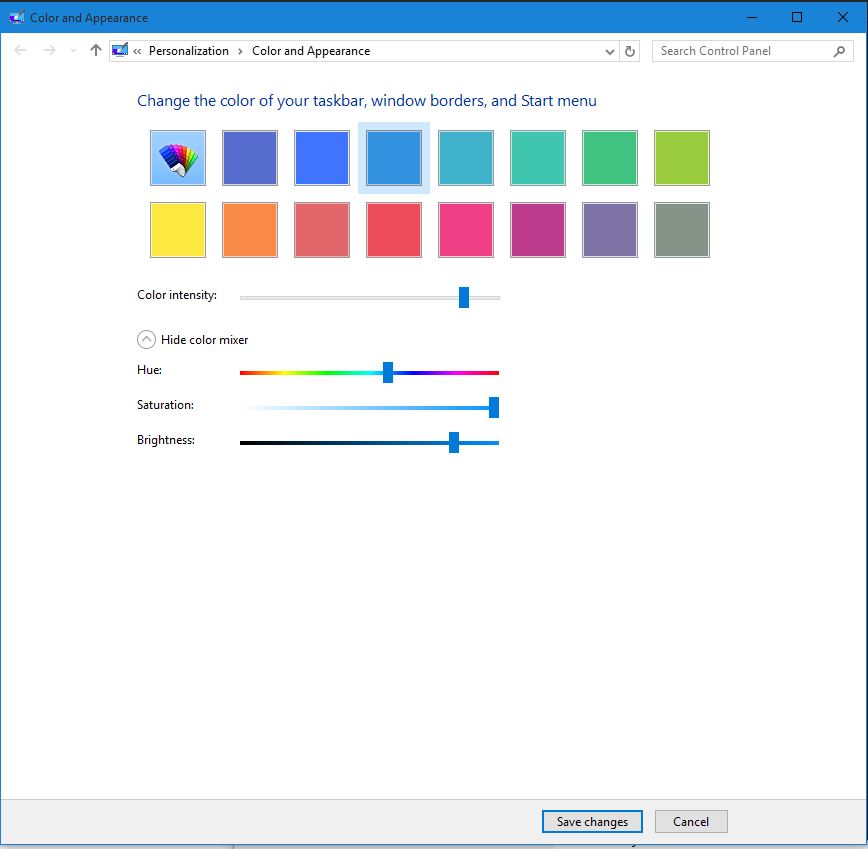
The list is limited but if you are not satisfied with the choices you can still access the old school control panel applet by first pressing Windows Key+R to open up the Run dialog box then copy-&-paste the following command line into the run box and run the command by clicking OK. There will be a Show or Hide color mixer toggle arrow and using that you can get any color your want. If you do not see it you may have windows set to choose colors based on the wallpaper but you will still see colors in this window so just choose a color and it should show up.
This trick was tested using the latest version of Windows 10 (not a test build) from the date of this article. Given what I have been seeing I would not be surprised if Microsoft adds more theming options later on as they seem to be listening a bit more to their users. Alot of us techy people have been testing out development versions even after windows 10’s release and they have an improved feedback tool to help you voice your issues.


